Excel to QuickBooks online Data Migration
Make Your Migration
Discover if your migration is possible and what it costs. Get your quote!
In QuickBooks, there are instances when you might need to import an Excel file. This article explores the methods to do so. Importing customer and vendor items, payroll lists, and transactions from Excel to QuickBooks can be useful in various situations.
This article provides instructions on how to import and export MS Excel files in QuickBooks Desktop 2024. It discusses the various file formats that can be used and the types of lists and transactions that can be imported and exported.
How to Import Accounting Data from Excel Sheets to QuickBooks Online?
When importing Excel files into QuickBooks, you have the option to import various data, such as customers, vendors, items, and the chart of accounts. There are several options available to customize the import process.
Suggested reading: Excat Macola To QuickBooks Data Migration
Option 1: Standard Import for Excel to QuickBooks Data Migration
You can import data into QuickBooks using a formatted Excel spreadsheet. Here are the steps to import Customers, Vendors, and Products:
- Go to the File menu and select Utilities > Import > Excel Files.
- Click “No” when prompted to Add/Edit Multiple List Entries.
Follow the wizard to import the files:
- Choose the type of data you want to import.
- QuickBooks will display an Excel spreadsheet with formatting. Enter your data, save the file, and close it.
- Review the results and view your data in QuickBooks.
- Click “Close” when finished.
Option 2: Advanced Import
For Items
If you’re importing items and don’t have an Excel or CSV file yet, follow these steps:
Step 1: Enable Inventory Preferences
- Log in as an administrator to your Quickbooks company file.
- Make sure that Single-user mode is selected.
- From the Edit menu in QuickBooks, select Preferences.
- In the left pane, choose the Items & Inventory tab, followed by the Company Preferences tab.
- Check the Inventory and Purchase Orders are Active checkbox, then click OK
Step 2: In Your Data File Set up Accounts
- From the Lists menu, choose Chart of Accounts.
- Right-click anywhere in the Chart of Accounts and select New.
Select the appropriate Account Type. For this step, you will need to create the following account types:
- Income Account: To track sales
- Asset Account: For inventory
- Cost of Goods Sold (COGS) Account
Suggested Reading: Epicor To QuickBooks Data Migration
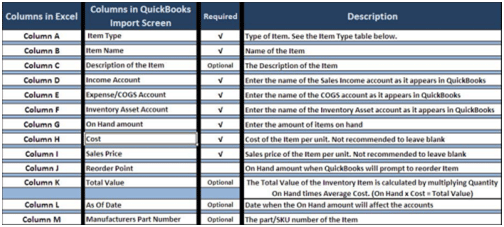
Step 3: For Each Item Create Your Data with the following:
- Item Name: Specify the desired name for your item list.
- Sub-Item Import: When importing a spreadsheet with sub-items, ensure that the parent item already exists in the item list or is listed before the sub-item.
- Sub-Item Formatting: If you are importing sub-items, the item name should follow a specific format, with the parent and sub-item separated by a colon.
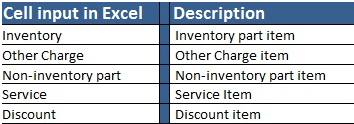
- Item Type: Indicate the item type, such as inventory part or service. Ensure consistency with the spelling used in QuickBooks item names.
- Item Description: The written description of the item must match what is found in the item list, sales orders, sales receipts, and invoices to maintain consistency across QuickBooks records.
- Income Account: Specify the income account that records sales related to this item.
- Inventory Asset Account: Indicate the asset account that will record the inventory value.
- COGS Account: Enter the account name where purchases of this item will be recorded as cost of goods sold (COGS).
- On-Hand Quantity: If it’s an inventory item, specify the quantity currently on hand.
- Cost of Item: Provide the cost of the item.
- Sales Price: Indicate the sales price of the item.
- Total Value: For new inventory items, specify the item’s total value.
- As of Date: For new inventory items, indicate when the item was last purchased.
- Passed Through: Enter “Y” in this column to ensure tracking of both the cost and the item’s price.
Additional Information
- Manufacturer’s Part Number or SKU: You can also import the part or stock-keeping unit (SKU) number of an item.
- Reorder Point: QuickBooks will ask you to place another order when the number of items on hand reaches this level.
Step 4: Create the Spreadsheet
Create a spreadsheet by using these tables as guide:
Step 5: Prepare to Import
Before starting the procedure, ensure you know the location of the Excel spreadsheet file. Throughout the process, QuickBooks and the spreadsheet will be synchronized.
To begin:
- Start QuickBooks.
- Open your company data file.
- Back up the QuickBooks company file without overwriting any previous backups.
Step 6: Import the Spreadsheet
Navigate to the File menu, select Utilities, and then Import, followed by Excel Files. On the Add/Edit Multiple List Entries window that appears, select No.
Select Advanced Import and set up a mapping
- Click Browse and select the Excel file.
- Choose the correct sheet in the Excel workbook.
- Select the data file has header rows checkbox to view the available headers in your file.
From the Choose a mapping dropdown, select Add New.
Know More: Daceasy To QuickBooks Data Migration
Mapping Window Options:
- Enter a name for easy identification in the mapping name box (e.g., customer, vendors).
- Choose the data to import from the Import type option.
- Select Save after aligning QuickBooks and Import Data columns.
- Select Preview to verify the mapping.
- Select Import to complete the import.
Duplicate Record Found Error Options:
- Keep the existing data and discard the imported data.
- Replace existing data with imported data, ignoring blank fields.
- Replace existing data with imported data, including fields with blank values.
Add/Edit Multiple Lists
Using the Add/Edit Multiple List Entries option, you can add or modify numerous customers, vendors, and products. Remember that this feature is intended for list information like names and descriptions and cannot be used to import transactions (invoices, bills, etc.).
- Select Add/Edit Multiple List Entries from the Lists menu.
- Select the desired list from the List drop-down menu.
- Use the filter to narrow down the list to a specific record.
- Click the Customize Columns button to choose which columns to display in the Add/Edit Multiple List Entries boxes. This way, you can swiftly work on the necessary columns. Click the Default button to revert to the list’s default columns.
To add:
• Choose a column from the left pane and click Add.
To remove:
• Choose a column from the right pane and click Remove.
To rearrange the column order:
- Choose a column from the right pane and click Move Up or Move Down.
- Click OK to save your changes.
- By selecting the appropriate fields, you can either add or update the entries. It is important to note that you can copy (Ctrl+C) data from Excel and paste (Ctrl+V) it into this window. Additionally, you have the ability to duplicate rows and copy them down by highlighting any field and selecting “Copy Down and Duplicate Row.”
- Lastly, you must select “Save Changes” to complete the process.
After saving your changes, you will receive a warning that informs you of the number of records that were saved. Additionally, QuickBooks will notify you of any errors that need to be addressed.
Export QuickBooks Data with MS Excel Files
QuickBooks allows you to export various lists, including customers, vendors, payroll, transactions, and items, into an Excel file. This feature enables you to make changes or modifications to the reports without affecting the data in QuickBooks. It’s particularly useful when you need to adjust the appearance or content of a report beyond the capabilities available within QuickBooks.
Customer/Vendor/Payroll List and Transactions
- To export customer, vendor, or employee data, such as name, contact information, and balances, open the Customer/Vendor/Payroll Center.
- Next, select the Excel drop-down menu and choose either Export Transactions or Export List.
- Use Export Transactions to export transactions by transaction type or by name. Use Export List to export a list of customers, vendors, or employees.
- To create a new worksheet or update an existing one, click on the Export window and then select the Export button. QuickBooks will open MS Excel and you can edit the information as needed.
Export Reports with MS Excel Files
- QuickBooks export to Excel includes the report’s data as it appears on the screen, subtotals, totals, and other calculation formulas, row headings specifying what each row describes, and information from the QuickBooks report’s headers and footers.
- To export a report, first open it and select the “Excel” drop-down at the top of the report. Then, choose whether to “Create a New Worksheet” or “Update Existing Worksheet.”
- In the “Send Report to Excel” window, specify what you want to do with the report.
- To see more export options, click the “Advanced” button and make your selections.Then, click “OK.”
- To ensure that the exported report shows header information, make sure the “On Printed Report and Screen” option is selected in the “Printing Options” section.
- If the exported report doesn’t include header information and you’re using a newer version of
- MS Excel, check the “Printing Options” section to ensure that the “On Printed Report and Screen” option is selected.
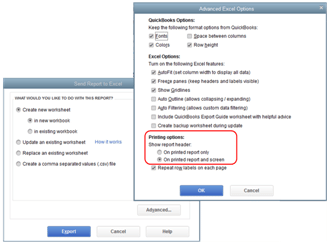
• To export data to MS Excel, select the Export button. You can edit the data as needed.
This article covers all the necessary information related to importing and exporting MS Excel files in QuickBooks. If you have any further issues, you can contact the ReconcileBooks team via live chat. The help desk team is available 24/7 to assist you.
Frequently Asked Questions
How to Import Journal Entries from Excel to QuickBooks?
• Navigate to the File menu.
• Select Utilities.
• Click on Import.
• Choose General journal entries.
• Browse and select the QBJ file you saved.
• Review the journal entries posted by your accountant on the Add General journal entries window.
How can I migrate or open IIF Files through Excel?
1. Open the Excel file: Launch Microsoft Excel and open the Excel file containing the financial data you want to migrate or open as an IIF file.
2. Navigate to the “File” tab: Click on the “File” tab in the top-left corner of the Excel window.
3. Select “Open”: From the “File” menu, choose the “Open” option.
4. Browse for the IIF file: In the “Open” dialog box, navigate to the location where the IIF file is saved on your computer.
5. Select the IIF file and click “Open”: Once you have located the IIF file, select it and click the “Open” button to open it in Excel.
How to Open a QuickBooks File in Excel?
1. Open QuickBooks.
2. Click on the Open drop-down menu.
3. Right-click on the QBW file you want to open.
4. Select the ‘File in Excel’ option to convert the QuickBooks file into an Excel file.
How to Import Checks into QuickBooks?
1. Click on the Accountant menu.
2. Click on Batch Enter Transactions.
3. Choose Checks as the transaction type and the bank account.
4. Enter the check date, account, and amount.
Click on Save.